TeamViewer is an excellent resource for remote controlling another computer. At Faster Law we use TeamViewer for all of our troubleshooting and support needs, but it can also be used to work remotely if the computer you have immediate access to can't do everything you need it to.
This article will explain how to install and configure TeamViewer. Keep in mind that in order to perform the initial setup you will need access to the both the computer you would like to control and the computer you would like to use to control the remote computer. Once the setup is complete, you will be able to access the remote computer at any time from any other device running TeamViewer.
This article will explain how to install and configure TeamViewer. Keep in mind that in order to perform the initial setup you will need access to the both the computer you would like to control and the computer you would like to use to control the remote computer. Once the setup is complete, you will be able to access the remote computer at any time from any other device running TeamViewer.
Step 1: Install TeamViewer on the remote computer
The first thing we need to do is install and TeamViewer on the computer you would like to remotely control. This can be done by following these steps:
1) Visit https://www.teamviewer.com/.
2) Click the button labeled "Download for free" and run the downloaded file.

3) Select "Default installation" and "Personal / Non-commercial use" in the setup window.
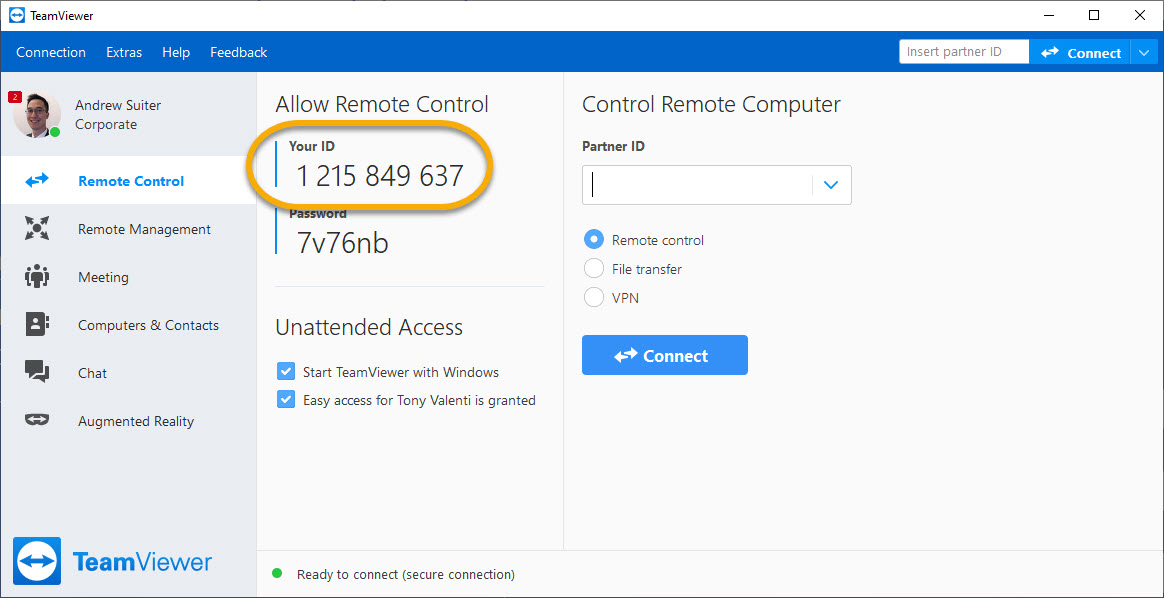
5) Navigate to the "Remote Control" tab and write down the 10 digit number listed under "Your ID".

5) Navigate to the "Remote Control" tab and write down the 10 digit number listed under "Your ID".

Step 2: Configure TeamViewer on the remote computer
Next, we'll need to configure TeamViewer with a static password that can be used to access the remote computer. TeamViewer will provide a random six-digit password, but this is automatically changed every so often and a static password will be necessary if there isn't anyone around to give you the generated password. You can follow these steps on the remote computer to configure a password:
1) Click the tab labeled "Extras" at the top of the TeamViewer window and select "Options".
1) Click the tab labeled "Extras" at the top of the TeamViewer window and select "Options".

2) Go to the "Security" tab and enter the password you would like to use in the "Password" and "Confirm password" fields, then click "OK".

Don't forget your ID number and password!
Without both the ID number and password, you won't be able to access this computer! Make sure you write down your ID number and choose a password that you can easily remember!
Leave your computer on!
Even if TeamViewer is installed and configured on the remove computer, you won't be able to access it if it's turned off! If you think you'll need to access your computer, leave it on when you leave and make sure TeamViewer is running.
Step 3: Remotely access the computer from another device
Once TeamViewer is installed and configured on the remote machine, you can access that machine from any other device that's running TeamViewer as long as you have the ID number and password. TeamViewer even has a mobile app that you can use to access your computer from your phone! To use another computer to access the remote computer, you can follow these steps:
1) Repeat the installation instructions from Step 1 on the computer you would like to use to control the remote computer. You will need to sign in using your previously created TeamViewer account but won't need the ID number from the controlling computer unless you plan to access that computer remotely as well.
2) Enter the remote computer's ID number in the "Insert Partner ID" field in the top right of the window and click "Connect".

3) Enter the password you configured in Step 2 and click "Log On".
And that's it!
You should now be connected to the remote computer to view and control the desktop. Keep in mind that you can only view one monitor at a time but can freely switch between monitors or change your view settings using the toolbar at the top of the screen share window.
For more information on how to control the remote PC or for general tips and tricks, please visit TeamViewer's Knowledge Base.
For more information on how to control the remote PC or for general tips and tricks, please visit TeamViewer's Knowledge Base.
Was this article helpful?
That’s Great!
Thank you for your feedback
Sorry! We couldn't be helpful
Thank you for your feedback
Feedback sent
We appreciate your effort and will try to fix the article